이미지 인식
우리의 뇌를 생각하면 시각적으로 인식하는 일은 쉬워 보인다. 보통 사람이라면 사자와 재규어를 구별할 줄 알고 표지판을 읽을 수 있으며 다른 사람의 얼굴 또한 어렵지 않게 인식할 수 있다. 그러나 이는 이미지를 인식하는 뇌의 능력이 놀라울 정도로 뛰어나기 때문에 가능한 것이지 이와 같은 일을 컴퓨터를 통해 해결하는 것은 매우 어려운 문제다.
지난 수 년간 기계학습 분야는 이미지 인식에 대해 엄청난 진전을 이루어 냈다. 특히 딥 러닝 기법의 하나인 convolutional neural network를 통해 혁신적인 성과를 거두었는데, 일부 분야에서는 사람의 인식 능력에 버금가거나 더 나은 결과를 보여주기도 했다.
연구자들은 학계에서 시작된 컴퓨터 비전 프로젝트인 ImageNet에서 자신들의 작업을 검증해왔고, 그들의 연구는 QuocNet, AlexNet, Inception (GoogLeNet), BN-Inception-v2와 같은 최신식 모델을 만들어냈다. 구글 내부 연구자와 외부 연구자 모두 이러한 모델을 설명하는 자료를 발표해 왔지만 자료가 널리 배포되고 있지는 않다. 그래서 TensorFlow는 구글이 개발한 이미지 인식의 가장 최신 모델인 Inception-v3를 활용하는 코드를 공개한다.
Inception-v3는 ImageNet의 Large Visual Recognition Challenge에서 2012년 데이터를 사용하여 훈련된 모델이다. 모든 이미지를 "얼룩말", "달마시안", "식기세척기"와 같은 1000 classes로 분류하는 것이 컴퓨터 비전의 표준 작업이다. 다음의 예는 AlexNet이 몇 가지 사진을 분류한 결과이다:
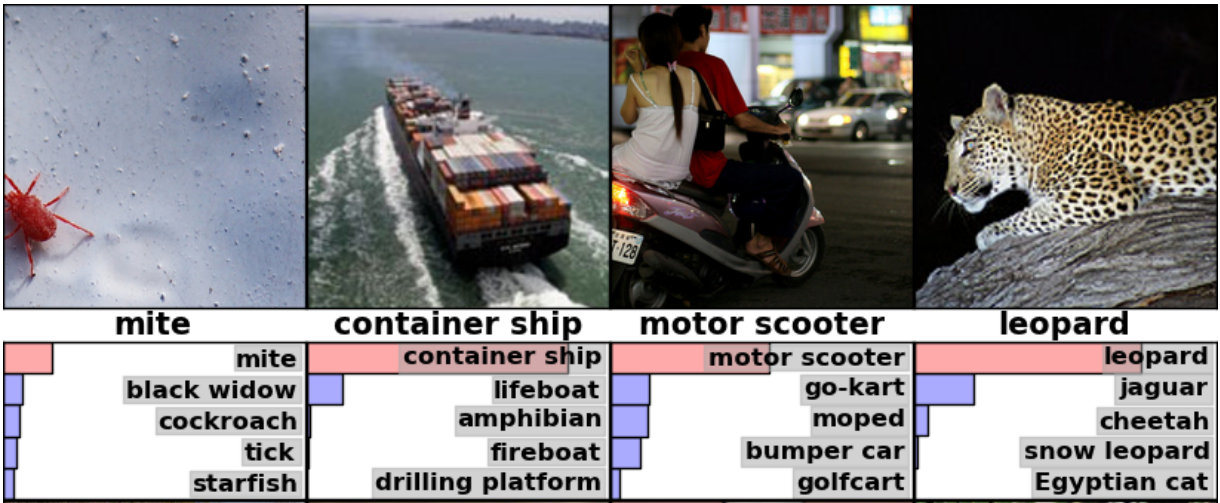
모델의 성능을 비교할 때는 "top-5 error rate"를 측정한다. 이는 모델이 가장 높은 확률로 예측한 5가지 예측이 정답이 아닌 빈도를 검토하는 것이다. 2012년 검증 데이터 세트에서 나타난 각 모델의 top-5 error rate는 AlexNet이 15.3%, BN-Inception-v2이 6.66%였고 Inception-v3는 3.46%를 달성했다.
ImageNet 챌린지에서 사람의 성과는 어떨까? Andrej Karpathy가 blog post에서 밝힌 바에 의하면 그의 top-5 error rate는 5.1%였다고 한다.
본 튜토리얼은 Inception-v3를 사용하는 방법을 알려줄 것이다. 먼저 Python이나 C++로 본 모델을 사용해서 이미지를 1000 classes로 분류하는 방법을 배운다. 그리고 이 모델을 통해 다른 이미지 인식 문제에서 다시 활용될 수 있는 고수준의 특징을 추출하는 방법 또한 논의할 것이다.
커뮤니티에서 이 모델을 어떤 모습으로 활용할지 기대되는 바이다.
Python API로 사용하기
프로그램이 처음 실행될 때 classify_image.py는 tensorflow.org로 부터 훈련된 모델을 다운로드 받는다.
필요한 하드디스크의 여유 공간은 200MB이다.
PIP 패키지에서 TensorFlow를 설치하고 터미널을 TensorFlow의 root 디렉토리로 설정한 후에 다음 명령어를 실행한다.
cd tensorflow/models/image/imagenet
python classify_image.py
위 명령어는 다운로드 받았던 판다 곰의 사진을 분류한다.
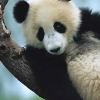
만약 모델이 올바르게 작동한다면, 다음과 같은 내용이 출력된다:
giant panda, panda, panda bear, coon bear, Ailuropoda melanoleuca (score = 0.88493)
indri, indris, Indri indri, Indri brevicaudatus (score = 0.00878)
lesser panda, red panda, panda, bear cat, cat bear, Ailurus fulgens (score = 0.00317)
custard apple (score = 0.00149)
earthstar (score = 0.00127)
다른 JPEG 이미지를 추가하려면 --image_file 인자를 수정하면 된다.
모델 데이터를 다른 디렉토리에 다운로드 받았다면,
--model_dir를 다운로드 받은 디렉토리로 지정해야 한다.
C++ API로 사용하기
C++의 프로덕션 환경에서도 Inception-v3 모델을 사용할 수 있다. 모델을 정의하는 GraphDef를 담고 있는 아카이브를 다운로드 받는 방법은 아래와 같다: (단, TensorFlow repository의 root 디렉토리에서 실행한다)
wget https://storage.googleapis.com/download.tensorflow.org/models/inception_dec_2015.zip -O tensorflow/examples/label_image/data/inception_dec_2015.zip

unzip tensorflow/examples/label_image/data/inception_dec_2015.zip -d tensorflow/examples/label_image/data/
다음으로 그래프를 불러오고 실행할 수 있는 코드를 담고 있는 C++ 바이너리를 컴파일 해야 한다. 만약 the instructions to download the source installation of TensorFlow에 나와 있는 지시사항을 자신의 플랫폼에 맞게 이행했다면, 터미널에서 다음과 같은 명령어를 실행하여 예제를 빌드할 수 있다:
bazel build tensorflow/examples/label_image/...
위 명령어가 입력되면 실행 가능한 바이너리 파일이 생성될 것이다. 파일을 실행하는 명령어는 다음과 같다:
bazel-bin/tensorflow/examples/label_image/label_image
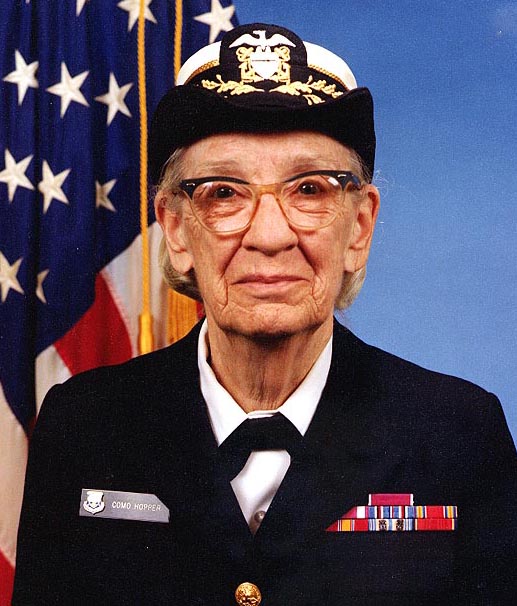
위 명령어는 프레임워크가 함께 전달되는 기본(default) 예제 이미지를 사용하며 아래와 유사한 내용이 출력된다:
I tensorflow/examples/label_image/main.cc:200] military uniform (866): 0.647296
I tensorflow/examples/label_image/main.cc:200] suit (794): 0.0477196
I tensorflow/examples/label_image/main.cc:200] academic gown (896): 0.0232411
I tensorflow/examples/label_image/main.cc:200] bow tie (817): 0.0157356
I tensorflow/examples/label_image/main.cc:200] bolo tie (940): 0.0145024
기본 제공 이미지인 Admiral Grace Hopper 사진을 사용한 결과이다. 0.6이라는 높은 점수로 모델의 네트워크가 군복을 입고 있는 여성을 올바르게 인식하고 있음을 확인할 수 있다.
다음으로 --image= 인자를 추가하여 본인이 갖고 있는 이미지로 테스트해 볼 수 있다. 예를 들면 다음과 같다:
bazel-bin/tensorflow/examples/label_image/label_image --image=my_image.png
tensorflow/examples/label_image/main.cc파일을 살펴보면 명령어가 어떻게 작동하는지 알 수 있다.
이 코드를 통해 사용자가 TensorFlow 라이브러리를 자신의 애플리케이션에 사용하는 데 도움이 되길 바라며 주요 함수들을 차례차례 살펴보자.
커맨드 라인 플래그(command line flags)는 파일을 불러온 위치와 입력된 이미지의 속성을 조정하는 기능을 한다.
모델은 정사각형 299x299 사이즈의 RGB 이미지를 취급하기 때문에 이를 input_width와 input_height 플래그라고 한다.
그리고 픽셀(pixel) 값을 0과 255사이의 정수 값(integer)에서 그래프를 사용하기 위한 실수 값(float)으로 스케일링(scaling)해야 한다.
스케일링은 input_mean과 input_std 플래그로 조절한다. 각 픽셀 값에서 input_mean을 빼고 난 후 input_std로 나눈다.
이러한 값들이 마술처럼 신기해 보일 수 있는데, 이는 모델을 만든 원작자가 훈련용 입력 이미지로서 사용하고 싶은 것으로서 정의했던 내용일 뿐이다. 만일 사용자가 스스로 훈련시킨 그래프가 있다면, 자신의 훈련 프로세스에 적합하도록 사용자가 원하는 값으로 조정하면 된다.
이러한 값들이 [ReadTensorFromImageFile()]
(https://github.com/tensorflow/tensorflow/blob/master/tensorflow/examples/label_image/main.cc#L88)의 함수를 통해 이미지에 어떻게 적용되는지 확인해 보자.
// Given an image file name, read in the data, try to decode it as an image,
// resize it to the requested size, and then scale the values as desired.
Status ReadTensorFromImageFile(string file_name, const int input_height,
                               const int input_width, const float input_mean,
                               const float input_std,
                               std::vector<Tensor>* out_tensors) {
  tensorflow::GraphDefBuilder b;
가장 먼저 실행하거나 불러올 모델을 설정하기 위해 GraphDefBuilder를 만든다.
  string input_name = "file_reader";
  string output_name = "normalized";
  tensorflow::Node* file_reader =
      tensorflow::ops::ReadFile(tensorflow::ops::Const(file_name, b.opts()),
                                b.opts().WithName(input_name));
그 다음에 실행할 소형 모델(small model)의 노드를 생성한다. 이는 픽셀 값을 불러오고, 변경하고, 스케일링하는 데 사용되며 메인 모델(main model)의 입력값으로 쓰일 것이다.
첫 번째로 만든 노드는 Const op(그래프 위의 노드를 의미하는 operation의 줄임말)이며 이는 우리가 불러 올 이미지의 파일 이름이 담긴 Tensor를 갖고 있다.
이것은 ReadFile op에게 첫 번째 입력값으로 전달된다. op를 생성하는 모든 함수의 마지막 인자로 b.opts()를 전달할 것임을 알 수 있을 것이다.
이 인자는 해당 노드가 GraphDefBuilder가 담고 있는 모델 정의에 반드시 추가되도록 한다.
또한 WithName() 함수를 b.opts()에게 호출하여 ReadFile 연산자를 지정할 것이다. 이것은 노드의 이름을 지정하는 것인데, 사실 사용자가 따로 수행하지 않더라도 자동 이름이 생성되어 할당되므로 필수적인 과정은 아니다. 하지만 디버깅에 도움이 되는 과정이다.
  // Now try to figure out what kind of file it is and decode it.
  const int wanted_channels = 3;
  tensorflow::Node* image_reader;
  if (tensorflow::StringPiece(file_name).ends_with(".png")) {
    image_reader = tensorflow::ops::DecodePng(
        file_reader,
        b.opts().WithAttr("channels", wanted_channels).WithName("png_reader"));
  } else {
    // Assume if it's not a PNG then it must be a JPEG.
    image_reader = tensorflow::ops::DecodeJpeg(
        file_reader,
        b.opts().WithAttr("channels", wanted_channels).WithName("jpeg_reader"));
  }
  // Now cast the image data to float so we can do normal math on it.
  tensorflow::Node* float_caster = tensorflow::ops::Cast(
      image_reader, tensorflow::DT_FLOAT, b.opts().WithName("float_caster"));
  // The convention for image ops in TensorFlow is that all images are expected
  // to be in batches, so that they're four-dimensional arrays with indices of
  // [batch, height, width, channel]. Because we only have a single image, we
  // have to add a batch dimension of 1 to the start with ExpandDims().
  tensorflow::Node* dims_expander = tensorflow::ops::ExpandDims(
      float_caster, tensorflow::ops::Const(0, b.opts()), b.opts());
  // Bilinearly resize the image to fit the required dimensions.
  tensorflow::Node* resized = tensorflow::ops::ResizeBilinear(
      dims_expander, tensorflow::ops::Const({input_height, input_width},
                                            b.opts().WithName("size")),
      b.opts());
  // Subtract the mean and divide by the scale.
  tensorflow::ops::Div(
      tensorflow::ops::Sub(
          resized, tensorflow::ops::Const({input_mean}, b.opts()), b.opts()),
      tensorflow::ops::Const({input_std}, b.opts()),
      b.opts().WithName(output_name));
그리고 나서 계속해서 노드를 추가하여, 파일 데이터를 이미지로 해독하고, 정수 값을 실수 값으로 바꾸고(scaling), 값의 크기를 변경하고(resizing), 마지막으로 픽셀값을 빼고 나누는 연산 과정을 거친다.
  // This runs the GraphDef network definition that we've just constructed, and
  // returns the results in the output tensor.
  tensorflow::GraphDef graph;
  TF_RETURN_IF_ERROR(b.ToGraphDef(&graph));
코드 마지막 줄에 변수 b에 담긴 모델 정의를 갖게 된다. ToGraphDef() 함수를 사용해서 변수 b를 완전한 그래프 정의로 변환한다.
  std::unique_ptr<tensorflow::Session> session(
      tensorflow::NewSession(tensorflow::SessionOptions()));
  TF_RETURN_IF_ERROR(session->Create(graph));
  TF_RETURN_IF_ERROR(session->Run({}, {output_name}, {}, out_tensors));
  return Status::OK();
그 다음으로 Session 오브젝트를 생성한다.
이는 그래프를 구현하는 인터페이스 오브젝트다. Session 오브젝트를 실행하여 어떤 노드로부터 출력을 얻을 것인지, 출력된 데이터를 어디에 둘지 설정한다.
이러한 작업은 Tensor 오브젝트에 대한 벡터 값을 준다 (벡터 값은 단 한 개의 오브젝트일 것이다). 여기서 Tensor의 의미는 다차원 배열로 생각하면 된다.
Tensor는 높이 299pixel, 너비 299pixel 그리고 실수 값이 있는 3가지 채널 이미지를 속성으로 가진다.
만약 사용자가 만든 프로젝트에 스스로 제작한 이미지 프로세싱 프레임워크가 있다면 그것을 대신 사용해도 된다.
메인 그래프에 이미지를 넣기 전에 똑같은 변환을 적용할수만 있다면 말이다.
지금까지 설명한 것은 C++에서 작은 TensorFlow 그래프를 그리는 간단한 예제이다.
그러나 미리 훈련된 Inception 모델에서는 파일에서 훨씬 더 큰 정의를 불러와야 하는데, 이때는 LoadGraph() 함수를 이용한다.
// Reads a model graph definition from disk, and creates a session object you
// can use to run it.
Status LoadGraph(string graph_file_name,
                 std::unique_ptr<tensorflow::Session>* session) {
  tensorflow::GraphDef graph_def;
  Status load_graph_status =
      ReadBinaryProto(tensorflow::Env::Default(), graph_file_name, &graph_def);
  if (!load_graph_status.ok()) {
    return tensorflow::errors::NotFound("Failed to load compute graph at '",
                                        graph_file_name, "'");
  }
이미지를 불러오는 코드를 검토해봤다면 코드의 많은 부분이 익숙할 것이다.
GraphDef 오브젝트를 생성하기 위해 GraphDefBuilder를 사용하기 보다는
직접 GraphDef를 담고 있는 protobuf 파일을 불러온다.
  session->reset(tensorflow::NewSession(tensorflow::SessionOptions()));
  Status session_create_status = (*session)->Create(graph_def);
  if (!session_create_status.ok()) {
    return session_create_status;
  }
  return Status::OK();
}
그리고 나서 GraphDef로부터 Session 오브젝트를 만들고 호출 함수(caller)에 전달하여 나중에 실행할 수 있도록 한다.
GetTopLabels() 함수는 이미지를 불러오는 다른 함수와 매우 유사하나 여기서는 메인 그래프를 그리고 그것을 가장 높은 점수의 레이블들로 분류한 리스트로 바꾼다는 점이 다르다.
이미지 불러오는 다른 함수처럼 GetTopLabels() 함수 또한 GraphDefBuilder를 만들고,
GraphDefBuilder에 노드 여러 개를 더한 다음 한 쌍의 아웃풋 tensors를 얻기 위해 짧은 그래프를 그린다.
한 쌍의 아웃풋 tensors는 가장 높은 결과의 정렬된 점수와 인덱스 포지션을 나타낸다.
// Analyzes the output of the Inception graph to retrieve the highest scores and
// their positions in the tensor, which correspond to categories.
Status GetTopLabels(const std::vector<Tensor>& outputs, int how_many_labels,
                    Tensor* indices, Tensor* scores) {
  tensorflow::GraphDefBuilder b;
  string output_name = "top_k";
  tensorflow::ops::TopK(tensorflow::ops::Const(outputs[0], b.opts()),
                        how_many_labels, b.opts().WithName(output_name));
  // This runs the GraphDef network definition that we've just constructed, and
  // returns the results in the output tensors.
  tensorflow::GraphDef graph;
  TF_RETURN_IF_ERROR(b.ToGraphDef(&graph));
  std::unique_ptr<tensorflow::Session> session(
      tensorflow::NewSession(tensorflow::SessionOptions()));
  TF_RETURN_IF_ERROR(session->Create(graph));
  // The TopK node returns two outputs, the scores and their original indices,
  // so we have to append :0 and :1 to specify them both.
  std::vector<Tensor> out_tensors;
  TF_RETURN_IF_ERROR(session->Run({}, {output_name + ":0", output_name + ":1"},
                                  {}, &out_tensors));
  *scores = out_tensors[0];
  *indices = out_tensors[1];
  return Status::OK();
PrintTopLabels() 함수는 이러한 정렬된 결과값을 입력 받아서 그 값들을 좀 더 친절한 방법으로 출력한다.
CheckTopLabel() 함수도 이와 매우 비슷한데, 디버깅 목적이 포함되어 있다. 상단 레이블(top label)이 우리가 예상하는 값임을 점검한다.
마지막으로 main() 함수는 이러한 모든 함수의 호출을 하나로 묶는 함수이다.
int main(int argc, char* argv[]) {
  // We need to call this to set up global state for TensorFlow.
  tensorflow::port::InitMain(argv[0], &argc, &argv);
  Status s = tensorflow::ParseCommandLineFlags(&argc, argv);
  if (!s.ok()) {
    LOG(ERROR) << "Error parsing command line flags: " << s.ToString();
    return -1;
  }

  // First we load and initialize the model.
  std::unique_ptr<tensorflow::Session> session;
  string graph_path = tensorflow::io::JoinPath(FLAGS_root_dir, FLAGS_graph);
  Status load_graph_status = LoadGraph(graph_path, &session);
  if (!load_graph_status.ok()) {
    LOG(ERROR) << load_graph_status;
    return -1;
  }
메인 그래프를 불러온다.
  // Get the image from disk as a float array of numbers, resized and normalized
  // to the specifications the main graph expects.
  std::vector<Tensor> resized_tensors;
  string image_path = tensorflow::io::JoinPath(FLAGS_root_dir, FLAGS_image);
  Status read_tensor_status = ReadTensorFromImageFile(
      image_path, FLAGS_input_height, FLAGS_input_width, FLAGS_input_mean,
      FLAGS_input_std, &resized_tensors);
  if (!read_tensor_status.ok()) {
    LOG(ERROR) << read_tensor_status;
    return -1;
  }
  const Tensor& resized_tensor = resized_tensors[0];
입력된 이미지를 불러오고, 사이즈를 조정(resize)하고 처리한다.
  // Actually run the image through the model.
  std::vector<Tensor> outputs;
  Status run_status = session->Run({{FLAGS_input_layer, resized_tensor}},
                                   {FLAGS_output_layer}, {}, &outputs);
  if (!run_status.ok()) {
    LOG(ERROR) << "Running model failed: " << run_status;
    return -1;
  }
입력된 이미지를 사용하여, 불러온 그래프를 구현한다(Here we run the loaded graph with the image as an input).
  // This is for automated testing to make sure we get the expected result with
  // the default settings. We know that label 866 (military uniform) should be
  // the top label for the Admiral Hopper image.
  if (FLAGS_self_test) {
    bool expected_matches;
    Status check_status = CheckTopLabel(outputs, 866, &expected_matches);
    if (!check_status.ok()) {
      LOG(ERROR) << "Running check failed: " << check_status;
      return -1;
    }
    if (!expected_matches) {
      LOG(ERROR) << "Self-test failed!";
      return -1;
    }
  }
테스트 목적으로 우리가 예상하는 결과를 얻도록 점검할 수 있다.
  // Do something interesting with the results we've generated.
  Status print_status = PrintTopLabels(outputs, FLAGS_labels);
마지막으로 우리가 찾은 레이블을 출력한다.
  if (!print_status.ok()) {
    LOG(ERROR) << "Running print failed: " << print_status;
    return -1;
  }
여기서 오류 처리는 TensorFlow의 Status 오브젝트를 사용한다. 이 오브젝트는 매우 간편한데, ok() 함수를 사용해서 오류가 발생했는지 사용자에게 알려주고 오류 메시지를 출력해준다.
지금까지 대상을 인식하는 것에 대해 설명했지만, 다른 모든 영역에서도 사용자가 발견하거나 스스로 훈련시킨 다른 모델을 사용하여 이와 유사한 코드를 활용할 수 있다. 이 예제로 인해서 사용자들이 TensorFlow를 자신의 프로젝트에 사용하는 데 도움이 되길 바란다.
연습문제: 하나의 문제를 잘 풀 수 있다면, 그것을 활용해서 그 밖의 관련된 다른 문제를 풀 때 활용할 수 있다. 이를 전이학습(transfer learning)이라고 한다. 여기서 전이학습을 하는 한 가지 방법은 네트워크의 최종 분류 레이어를 제거하고 2048 차원의 벡터 값인 next-to-last layer of the CNN을 추출하는 것이다. 이에 대한 안내 문서는 in the how-to section을 참조하면 된다.
더 많은 학습을 위한 자료
신경망(neural network)에 대해 전반적으로 알고 싶다면, Michael Nielsen의 free online book이 훌륭한 자료가 될 것이다. convolutional neural network에 한해서는 Chris Olah의 nice blog posts와 Michael Nielsen의 great chapter을 참조하면 된다.
convolutional neural network을 사용하는 방법을 더 알고 싶다면 TensorFlow의 deep convolutional networks tutorial로 건너뛰거나 상대적으로 더 평이한 ML beginner 혹은 ML expert MNIST 입문자 튜토리얼로 시작해도 된다. 마지막으로 이 영역에 대한 연구에 박차를 가하고 싶다면, 이 튜토리얼이 참조한 모든 문서들의 최근 연구를 읽어보면 된다.